Making your enemies run after your player character is a common task in 2D games. If you are using Godot and having trouble implementing pathfinding while respecting your TileSet collisions, you’ve come to the right place!
I love Godot. It’s a really good game engine. It has its flaws, sure; but it’s very flexible, it’s designed to give the developer a lot of control, and it’s still very easy to use. That said, 2D top-down navigation on TileMaps has proven to be a difficult task to research and plan correctly.
In this tutorial we will learn how to implement pathfinding, in a flexible and portable way, with avoiding obstacle tiles being the main focus point which was a pain for me.
Motivation
Godot 4.3 introduced a lot of new features. Among them are TileMapLayers nodes, which replace the
old TileMap node’s layers property. This isn’t actually part of the problem; they mostly work the
same as before.
The problem is, I was under the impression that if I give some tiles collision information, it would be used by the pathfinding and be avoided by the moving actors. That is not the case!
I actually got the most useful information in understanding how to use pathfinding by watching this video by Coding Quests on YouTube. His video provides a great basis, and I recommend you watch it.
This tutorial will do much of the same, but I will try to give you a more flexible way to handle obstacle tiles, so that it is more scalable for your game, and easier to manage and expand on.
Starting set-up
First thing’s first, we need to create some structure and understand how the nodes interact.
Let’s assume we have the following scene tree (I only included relevant nodes for brevity):
SceneBase (Node2D)
├── GroundLayer (TileMapLayer)
├── ActorLayer (TileMapLayer)
│   ├── Player (CharacterBody2D)
│   └── Enemy (CharacterBody2D)
├── Trees (TileMapLayer)
└── Rocks (TileMapLayer)
This is the base starting point. We have a ground layer, which has tiles like grass and dirt. We have an actors layer, inside it, we have two actors: the player and an enemy. We want the enemy to chase the player around, finding their path and avoiding blocked tiles on the way.
Below those, we have 2 more layers just so we can make sure our pathfinding is working across multiple layers automatically in a more generic, less constrained way than having to manually link them for each map scene.
Preparing the TileSets
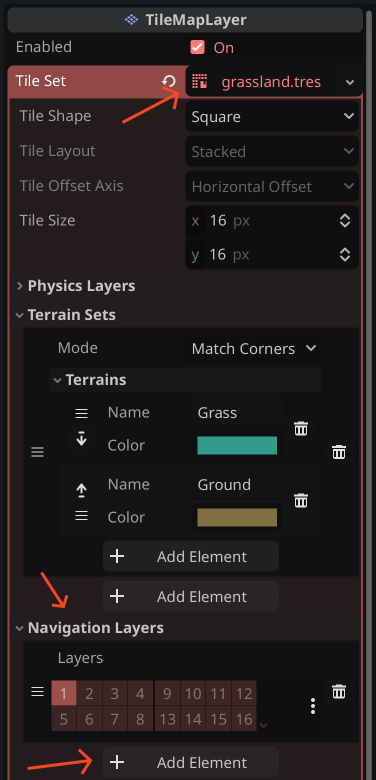
For any navigable TileSets you plan to use, you will need to add navigation support to it, to allow pathfinding to work.
To do that, first, find one of the layers that uses the desired TileSet, and expand the TileSet’s details.
Then, expand the “Navigation Layers” section, and add a layer with the bitmask of your choice (just leave at the default if you’re unsure).
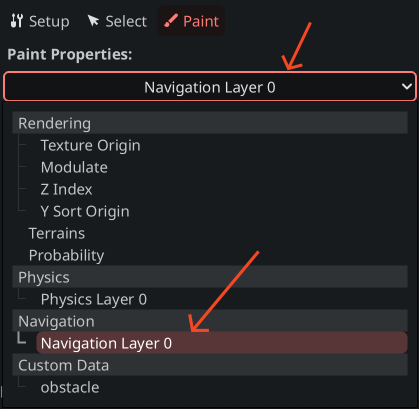
Once that’s done, go to the TileSet editor. Go to the “Paint” tab, and select a walkable tile, such as grass or dirt.
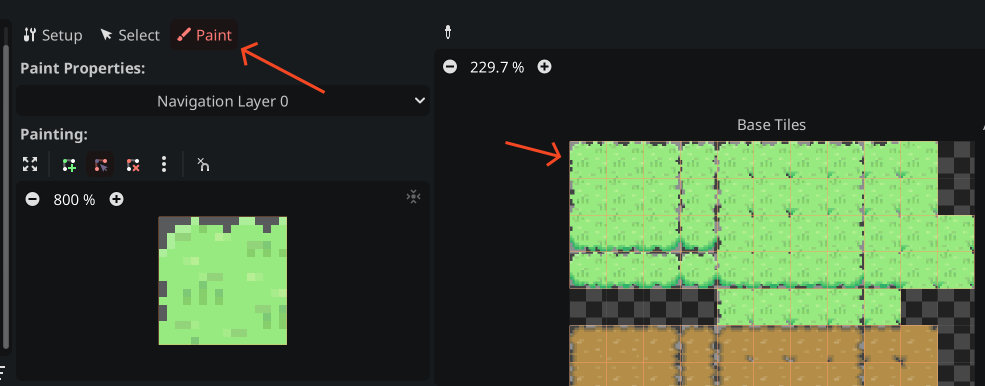
From “Paint Properties”, under “Navigation”, select the navigation layer you created (it should be the only one).
You can start painting on a few more tiles as you see fit. Any tile you mark will be walkable.
Implementing pathfinding
Now that the basic setup is out of the way, we can carry on. Pathfinding isn’t too tricky to implement in this case for just the base.
First, let’s add a child node to the enemy, of type NavigationAgent2D.
You may also create a nav node via code, or use an @export varas alternate methods to get a navigation node; but we’ll keep it simple in this tutorial.
Then, let’s attach a (or modify our existing) script for the enemy.
extends CharacterBody2D
class_name Enemy

var speed := 50.0 # can be anything

@onready var nav: NavigationAgent2D = $NavigationAgent2D # change if needed
@onready var player: CharacterBody2D = %Player # change if needed

func _ready() -> void:
	actor_setup.call_deferred()
	nav.velocity_computed.connect(_velocity_computed)

func actor_setup():
	# Wait for the first physics frame so the NavigationServer can sync.
	await get_tree().physics_frame

	# Now that the navigation map is no longer empty, set the movement target.
	set_movement_target(player.position)

func set_movement_target(movement_target: Vector2):
	nav.target_position = movement_target

func _physics_process(delta: float) -> void:
	_move_towards_player()

func _move_towards_player():
  pass
Before we implement the actual movement function, let’s go over what we have added so far.
In the _ready() function, we do 2 things:
- Call the
actor_setupfunction so thenavnode is ready. We usecall_deferred()to make it wait for the next frame before it is invoked. This assures us that thenavnode is ready. - We connect the
velocity_computedsignal so we can get thenavnode’s velocity for avoidance (if enabled).
The actor_setup function also does a couple of things:
- Waits for 1 physics frame to wait for the
navagent to be ready - Sets the navigator’s target position to the player position
What does avoidance do?
What is avoidance, you ask? It is a feature of the NavigationAgent2D that allows it to avoid other navigation agents. You can define a radius to circle around agents on your path, and the path will be recalculated to avoid it. However, it does not relate to collision tiles or static obstacles. We will handle that a bit later on.
Implementing the movement logic
Getting back on topic, we will go ahead and implement the logic to move the actor using the navigation agent.
This is most of the logic involving the actual navigation agent, so let’s get going.
func _move_towards_player() -> void:
	# Update the player position
	set_movement_target(player.position)

	# If we're at the target, stop
	if nav.is_navigation_finished():
		return

	# Get pathfinding information
	var current_agent_position: Vector2 = global_position
	var next_path_position: Vector2 = nav.get_next_path_position()

	# Calculate the new velocity
	var new_velocity = current_agent_position.direction_to(next_path_position) * speed

	# Set correct velocity
	if nav.avoidance_enabled:
		nav.set_velocity(new_velocity)
	else:
		_velocity_computed(new_velocity)

	# Do the movement
	move_and_slide()

func _velocity_computed(safe_velocity: Vector2):
	velocity = safe_velocity
The comments should help you understand what we do on each section, but I want to explain a bit more about the avoidance lines:
func _move_towards_player() -> void:
	# ...
	# Set correct velocity
	if nav.avoidance_enabled:
		nav.set_velocity(new_velocity)
	else:
		_velocity_computed(new_velocity)
	# ...

func _velocity_computed(safe_velocity: Vector2):
	velocity = safe_velocity
If the nav’s avoidance is enabled, we don’t directly set the velocity of the actor. We instead pass the calculated velocity to the nav agent itself. The agent will use it to handle the next calculations in order to avoid other nav agents, and report back when it has a new “safer” path.
When the _velocity_computed function is called (either by us or by the velocity_computed signal
of the nav), we simply set the velocity of the actor. Avoidance will make sure to call the
velocity_computed when necessary, which is why we don’t manually set it in the case it is enabled.
It’s important to note that only NavigationAgent2Dare considered for avoidance, not any obstacle. For that, just continue reading.
Testing our setup
This setup should work for the initial test. Just run the game and see if it works.
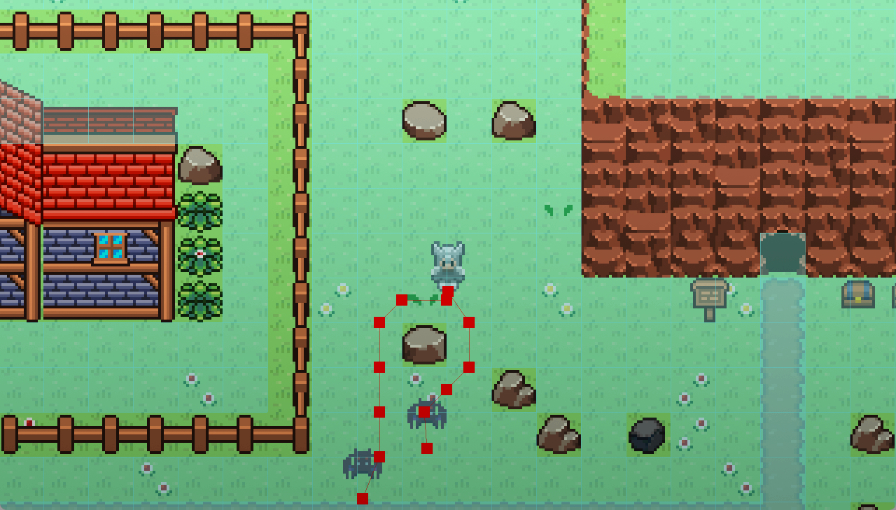
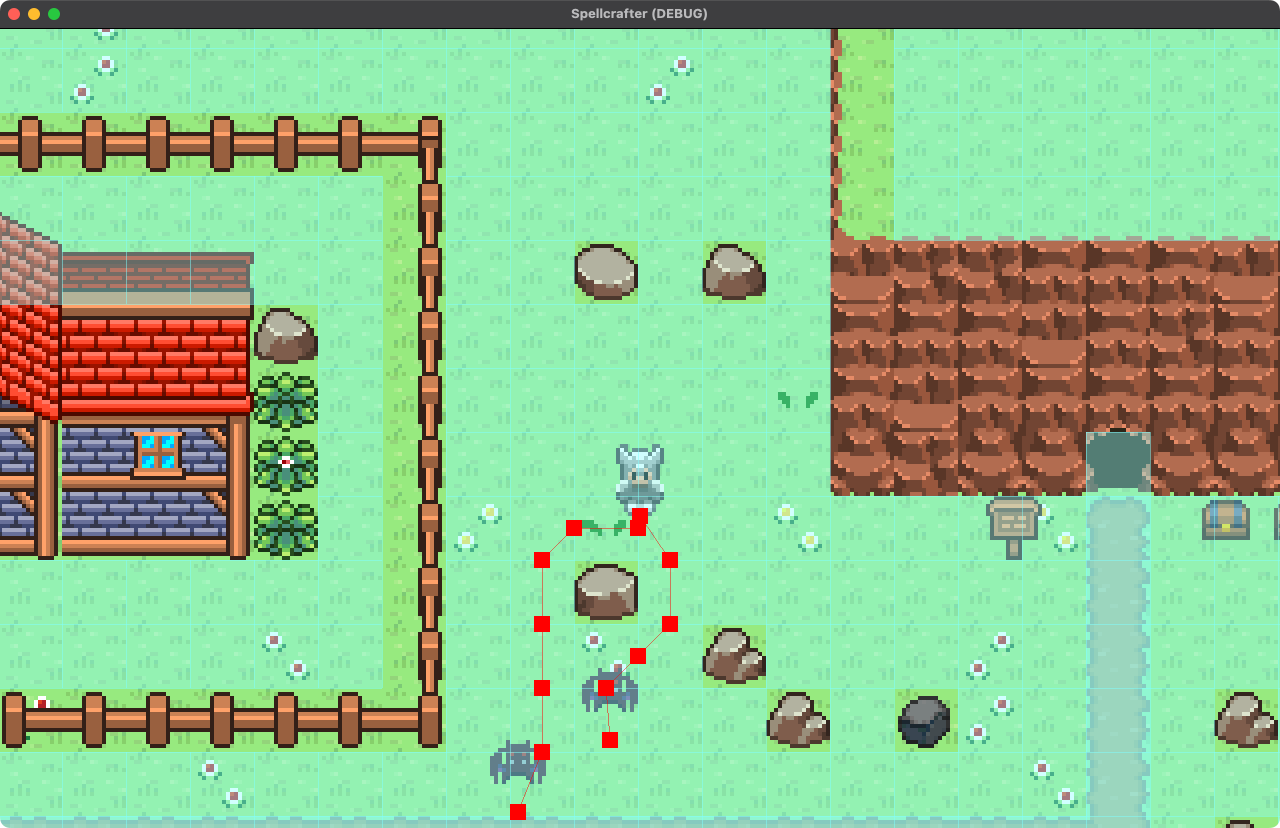
To make it more visual, you can go to the navigation agent of the enemy, and check the “Debug” property; which will show us the paths the enemy is trying to follow. Also, in Godot’s top menu, under “Debug” -> check “Visible Navigation”, which will highlight which tiles are used as possible paths and which aren’t.
Here’s how it looks right now:
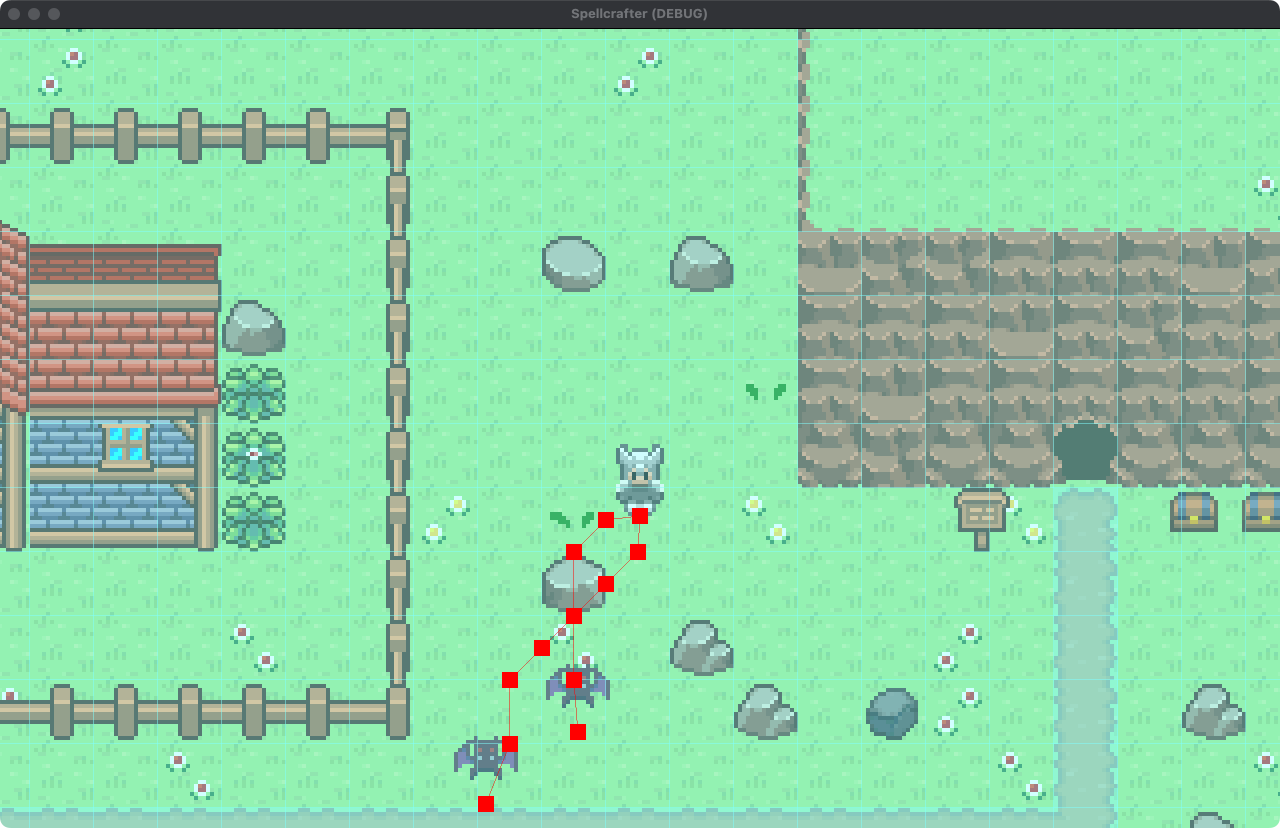
Ok, that works nicely. How would we go about removing obstacle tiles, though?
Obstacle tiles
Some tiles, such as rocks and trees, are meant to be obstacles which block your (and others’) path. But unfortunately (and this is an area where Godot can definitely improve), linking the navigation area to tile collisions isn’t possible out of the box without some code.
Let’s see how we need to implement that.
Preparing the TileSet
One thing we need is to set some collision on the relevant tiles.
In your TileSet’s inspector, add a Physics layer, similar to how we added a Navigation layer:
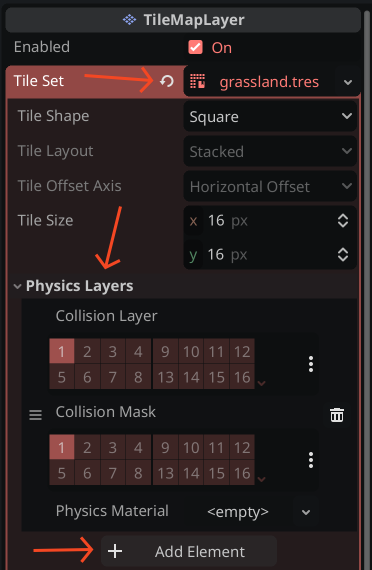
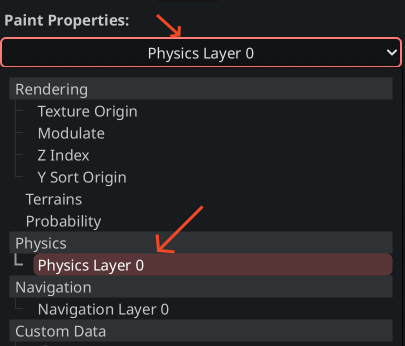
Then, once again, go to the TileSet panel, click “Paint”, but this time, under “Physics Layers” choose the layer you just added:
Now when you paint tiles you will make them block your path and your enemies’, if they try to walk through it.
They will still try to walk through these tiles, because the navigation isn’t aware of the physics there. This is where we do a little bit of magic.
To your ground layer, attach a new script. Call it whatever you like, I picked
NavigationTileLayer.
In this script we need to do a few things:
- We need to get information about all the relevant layers (ones that contain obstacles)
- We need to tell the navigation system that any tiles with collision should be removed from the nav area
In order to do that, we’ll write a little bit of code. Not much more, I promise!
To get the information on relevant layers, there are many possibilities:
- Put them all in the same group, and use
get_tree().get_nodes_in_group() - Find any sibling nodes with the
TileMapLayertype - Use an
@export varand manually put the relevant layers in there (less recommended)
To make it super simple, I think we’ll go with the first option.
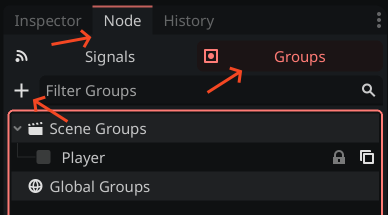
First, select your TileMapLayers in the scene. Then in the inspector pane, click the “Node” tab,
then “Groups”.
Simply add a new group with the ”+” button:
and add them to the Obstacles group (change the name if you want but just make sure to also change
it in the script).
This is how it will look when added (it’s your choice whether to make this group global or scene local):

Great, now let’s add a function for that in our script:
extends TileMapLayer

var _obstacles: Array[TileMapLayer] = []

func _ready() -> void:
	_get_obstacle_layers()

func _get_obstacle_layers():
	# make sure the name here is the same as the group's
	var layers = get_tree().get_nodes_in_group("Obstacles")

	for layer in layers:
		if layer is not TileMapLayer: continue
		_obstacles.append(layer)
Ok, great! Now the next step is to remove navigation from collision tiles.
We will need a couple of things for that. First, we need to implement the
_use_tile_data_runtime_update function.
func _use_tile_data_runtime_update(coords: Vector2i) -> bool:
	return _is_used_by_obstacle(coords)
This function is an override for a built-in for TileMapLayer. It should return a bool, which
represents whether the cell at coords needs to have its data updated in runtime.
It makes sure we don’t run excess updates on every cell and only update what we need. You probably
noticed I added a stub _is_used_by_obstacle function there, let’s implement that now:
func _is_used_by_obstacle(coords: Vector2i) -> bool:
	for layer in _obstacles:
		if coords in layer.get_used_cells():
			var is_obstacle = layer.get_cell_tile_data(coords).get_collision_polygons_count(0) > 0
			if is_obstacle:
				return true
	return false
Our logic here is pretty simple:
- Iterate over every layer in
_obstacles - For each layer, check if the coords correspond to a cell
- If there is a cell in that layer on those coords, check if it is an obstacle:
- We do the check by getting the tile data, and retrieving the collision polygons count for it
- If it has more than 0 (i.e., it has a collision shape), it is an obstacle
- The
0we pass to the function is the index of the physics layer we created on the TileSet, so if you had previous layers, this is what you would want to change - Return
trueif it is an obstacle - Continue otherwise
- If there is a cell in that layer on those coords, check if it is an obstacle:
- If no obstacles were found and we reached this point, then we return
false
It’s an efficient way to attach the information from the TileMapLayer into the navigation area. We
don’t need any custom data layer or any additional setup for the tiles other than the collision
(which we would want anyway, so our player would be blocked).
Now for the last piece of the puzzle, we just need to actually set the navigation polygon on the tile to accommodate to the walkable state of the tile. Add a new method on the script:
func _tile_data_runtime_update(coords: Vector2i, tile_data: TileData) -> void:
	if not _is_used_by_obstacle(coords):
		tile_data.set_navigation_polygon(0, null)
This is another built-in method in Godot that will only run on the tiles that have returned true
inside the previous _use_tile_data_runtime_update method. It will only try to update the tiles
that are relevant, in order to save on memory. Since it will only run on tiles we already queried
that are not walkable, it won’t try to update every tile.
Last test
Let’s run the game one more time - we can see that any tiles that contain collision are not highlighted in the navigation debug. We can also notice our agent finding ways around the obstacles. Success!
Conclusion
I believe this is a pretty flexible system. Basically, if we need to add more TileSets or tiles to the same set, we just need to make sure of two things:
- The layer is grouped (or otherwise connected to the
NavigationTileLayerscript’s obstacles) - We have collision polygons on the required tiles
Other than those, no special set up is required. This means you can essentially put the script anywhere, even on a completely separate node, and re-use that same node across all your maps with minimal effort. And if you don’t want to use groups, you can find other ways to get the correct layers to use.
Hopefully this tutorial helps you understand a bit more about the TileMapLayer nodes, about
NavigationAgent2D, and about how to use tile data to your advantage. Personally, I had trouble
finding resources that properly explain how to handle 2d obstacles using pathfinding, so I thought
it could be a nice write-up for others to learn from.
Do you have ideas for improvement on this system? Do you have any questions? Please leave a comment!
About the author
My name is Chen Asraf. I’m a programmer at heart — it's both my job that I love and my favorite hobby. Professionally, I make fully fledged, production-ready web, desktop and mobile apps for start-ups and businesses; or consult, advise and help train teams.
I'm passionate about tech, problem solving and building things that people love. Find me on social media: